
is explained in the user guide with
easy steps
and simple language for users to understand.
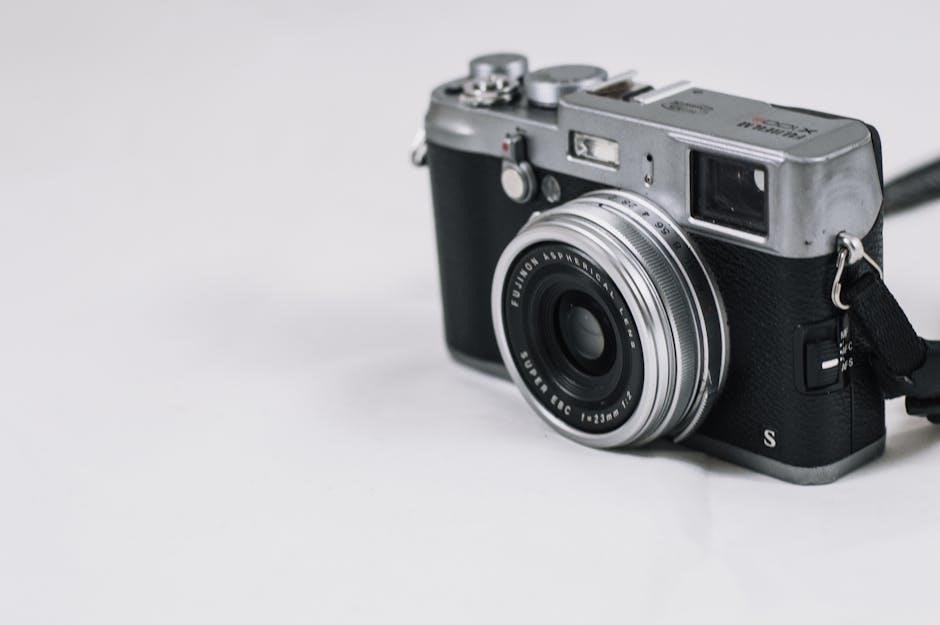
Overview of the Product
The Geniani humidifier is a 2 in 1 device that serves as a cool mist maker and an aroma humidifier, providing a unique combination of features. With its ultrasonic technology, it operates quietly, making it ideal for nighttime use. The product has a simple and compact design, making it easy to place in any room. The humidifier is designed to provide a healthy and comfortable environment, with features such as automatic humidity control and a night light. It is also easy to refill and clean, with a top-fill design that allows for convenient water pouring. The Geniani humidifier is a great addition to any home, providing a range of benefits for users, including improved sleep quality and a healthier environment. The product is also suitable for use in nurseries and bedrooms, where a quiet and comfortable environment is essential. It is a versatile and practical device.
Key Features of the Humidifier

The Geniani humidifier has several key features that make it an attractive option for users. It has a 4L capacity, which allows it to last for an entire day on a single refill. The humidifier also features a silent running mode, with an operating noise level of only 36 decibels. Additionally, it has a smart mode that automatically adjusts the humidity levels to maintain a comfortable and healthy environment. The humidifier is also designed with a night light feature, which provides a sense of safety and comfort. It is a 2 in 1 device, serving as both a cool mist maker and an aroma humidifier. The product is also easy to use and maintain, with a simple top-fill design that allows for convenient water refilling. Overall, the Geniani humidifier is a feature-rich device that provides a range of benefits for users. It is a practical and versatile device.
Humidifier Specifications
includes details about the product with
technical data
and dimensions for user reference always.
Capacity and Refill
The Geniani humidifier has a large capacity of 4L, which allows it to run for a full day on a single refill. The top-fill design makes refilling easy and convenient, as users can simply pour water into the insert. This feature is especially useful for busy households or for those who want a low-maintenance humidifier. With its large capacity, the humidifier can cover a significant area, making it ideal for medium to large-sized rooms. The refill process is also straightforward, and the humidifier’s design allows for easy cleaning and maintenance. Overall, the Geniani humidifier’s capacity and refill design make it a practical and efficient solution for maintaining a healthy humidity level in the home. The humidifier’s water tank is also designed to be durable and long-lasting, with a sturdy construction that can withstand regular use.
Noise Level and Operation
The Geniani humidifier operates at a very quiet noise level, with a sound output of only 36 decibels, making it ideal for nighttime use or for use in bedrooms. The ultrasonic technology used in the humidifier allows for a silent running operation, which is comparable to the sound of a ticking clock. This feature makes it perfect for use in homes with light sleepers or for those who value a quiet environment. The humidifier’s operation is also designed to be efficient and effective, with a smart mode that automatically adjusts the humidity level to maintain a comfortable and healthy environment. The noise level and operation of the Geniani humidifier make it a great choice for those who want a reliable and quiet humidifier. The humidifier’s quiet operation also makes it suitable for use in nurseries or baby rooms. Overall, the Geniani humidifier’s noise level and operation are designed for comfort and convenience.

Benefits of Using the Humidifier
Using the Geniani humidifier provides numerous health and comfort
benefits
for users.
Improved Sleep Quality
The Geniani humidifier plays a significant role in improving sleep quality by maintaining a comfortable humidity level in the room. This is especially important for people who suffer from dry skin, congestion, and other respiratory issues. With the humidifier’s silent operation, users can enjoy a peaceful night’s sleep without any disturbances. The device’s ability to regulate humidity levels also helps to prevent dryness and irritation in the throat and nasal passages, making it easier to breathe and sleep soundly. Additionally, the humidifier’s night light feature provides a sense of safety and comfort, promoting a restful and relaxing sleep environment. By using the Geniani humidifier, users can wake up feeling refreshed and well-rested, ready to take on the day with energy and enthusiasm. The humidifier’s benefits are numerous, and its impact on sleep quality is one of the most significant advantages.
Healthy Environment for Children
Creating a healthy environment for children is crucial for their development and well-being. The Geniani humidifier helps to achieve this by maintaining a comfortable humidity level in the room, making it easier for children to breathe and sleep soundly. The device’s ability to regulate humidity levels also helps to prevent the spread of germs and bacteria, reducing the risk of illness and infection. Furthermore, the humidifier’s night light feature provides a sense of safety and comfort, helping children to feel secure and relaxed in their environment. By using the Geniani humidifier, parents can help to create a healthy and nurturing environment for their children, promoting healthy growth and development. The humidifier’s benefits are especially important for young children, who are more susceptible to illness and infection. With the Geniani humidifier, parents can have peace of mind knowing they are providing a healthy environment for their children.

Smart Mode and Automatic Adjustment
uses sensors to automatically adjust humidity levels for optimal comfort with
ease
and convenience.
Automatic Humidity Control
The Geniani humidifier features an automatic humidity control system that maintains a healthy level of moisture in the air. This is achieved through the use of sensors that monitor the humidity levels and adjust the mist output accordingly. The system is designed to maintain a relative humidity of 40-60%, which is considered optimal for most environments. With this feature, users can enjoy a comfortable and healthy environment without having to constantly monitor and adjust the humidifier. The automatic humidity control system is also convenient, as it eliminates the need for manual adjustments and ensures that the humidifier is always operating at the optimal level. This feature is especially useful for people who want to maintain a consistent level of humidity in their home or office, and it is a key benefit of the Geniani humidifier. The system is easy to use and provides a high level of accuracy.
Convenience and Ease of Use
The Geniani humidifier is designed to be easy to use and convenient, with a simple and intuitive interface. The top-fill design makes it easy to refill the water tank, and the compact size allows it to fit easily on a nightstand or desk. The humidifier also features a night light, which provides a soothing glow and can be especially helpful for children. The device is also easy to clean and maintain, with a washable filter and a removable water tank. Additionally, the humidifier is quiet and unobtrusive, making it perfect for use in bedrooms and other quiet spaces. Overall, the Geniani humidifier is a convenient and easy-to-use device that can help to improve the comfort and health of any room. The user-friendly design and simple operation make it accessible to everyone, regardless of technical expertise. The humidifier is a great addition to any home or office.